** ENTER TO WIN A FREE COPY OF MY BOOK - DETAILS IN POST **

ContactMe

Search Blog

translate


When most folks think of a Globe Knot, they think of a round Turk's Head, but you can also use it to create a square Turk's Head. At first look this design may look as though it will be complicated to tie, but don't let that persuade you not to attempt it. If you place the pins on the mandrel correctly, you will have no trouble tying this Globe Knot.
In this article I have chosen to include the full in-depth tutorial along with the Adobe Acrobat tutorial for download.


Recently I have taken an interest in tying Globe Knot Cubes and it has become quite obsessive. When I first started tying knots, I thought Globe Knots were out of reach, but if you follow the tutorials correctly, you shouldn't have too much trouble tying.


A simple and easy to tie adjustable paracord necklace.
The necklace pendant is called a Santi Skull Fob from Lighthound.


At first glance at these cubes, you may think that it would be difficult to tie, but once you see how they are tied, you will see that it is relatively simple.
Wikipedia says this about a Menger Sponge: "In mathematics, the Menger sponge is a fractal curve... The Menger sponge simultaneously exhibits an infinite surface area and encloses zero volume."


I've noticed a few of these types of charms on the internet, but I couldn't find any that used my favorite team, so I decided to make my own.
I purchased blank Shoelace Charms on Etsy and once I received them, got started using Photoshop to create the correct size logo. Once I created the logo, I printed it on glossy photo paper. Then I stuck the adhesive clear covers over the logo and cut out around the cover. I attached the covered logo to the charm by using Krazy "Craft" glue.


While getting ready for kickoff, I decided I would tinker with a type of design that I have never tied. Though the design is simple, it does take patience to get the letter to look correct.
This fob was modeled after JD of TyingItAllTogether Alpha Fob.


This is probably the most popular paracord knot on the internet. it's fun to tie and easy to learn.
This is a beginner's guide to creating a Solomon Bar fob.
I will be using this as a "beta test" to determine what type of guides you find useful. And hopefully I can gain a more broad audience.


I've been meaning to celebrate Alabama's 14th National Championship with a new post, but time hasn't allowed it. With the 2012 season less than two weeks away, there was no better time than today.
This is my first attempt at using 450 Type II Paracord. I have been meaning to get some 450 to test the differences with 550, and since Vermont's Barre had a different color of red that I hadn't been able to get in 550, I decided to give it a try. Once it arrived, I was pleased to see that Imperial Red matched almost exactly to Alabama's Crimson color.


A new Facebook friend, Matthias Agnello created this fantastic paracord design that has a mean-tough-rugged style.
This design is easy to learn and fun to tie.


Since I've been promising that I was going to get back on the horse and starting posting more frequently, I decided to use my day off for the 4th of July to tie this design. For those who may not be from the United States, the Fourth of July is a celebration of our Independence from Great Britain from which we celebrate by grilling steaks, making homemade ice cream and blasting fireworks. I finished off the steaks and ice cream and decided to leave the fireworks to someone else because I had a key chain on my mind that needed to get tied.


I am truly pleased with the support from my readers, I asked you to click on the advertising links and try to reach five dollars in revenue in one day and you really came through, at last count it was over seven dollars, Thank You.
Since you did your part, I've been working for the past several hours to put together the tutorial that I promised.
As with most of my tutorials, I'll be including the tutorial in PDF form and a shorter version that is in image format.


This is an original design by JD of TyingItAllTogether, found in the photos of some of his new work on his Twitter channel.

This is a really great looking design, though it may not sparkle as well as it should in this monochrome format, but I kind of dig single-plain colors for fobs that I intend to carry on my key chain.

Although JD keeps churning out new and innovative tutorials, to my knowledge he hasn't release a video for tying this design yet.


This design was created by JD of TyingItAllTogether, I am only showing how to tie it and attach it to a buckle.
I am frequently asked how I attach buckles to bracelets, since it's hard to explain, I thought I would show it in this tutorial. The method used to attach this bracelet to a buckle will work on many different types of knot designs.


In a previous post, I presented the Braided Turk's Head Lanyard. It was originally designed by Trident and creates a stylish lanyard, I added the lanyard to a Turk's Head-handled flashlight.

This design shows the versatility of the Long Two Bight Turk's Head and has been a favorite of mine for a while.


For this post, I decided to show some of the newest "quick deploy" solutions for creating emergency paracord bracelets. You may have noticed one of the designs in the image from before, I previously featured it for an emergency bracelet and I thought it would fit perfectly with the other two bracelet designs.


This tutorial shows how to create a better Paracord Needle than the Perma Lok Lacing Needle (in my opinion).

After trying many different techniques from collaborations between my readers and me, I decided that I would take the simplest route possible. You can make this type of Lacing Needle with little more than a screw driver, drill and something to cut the needle material (i.e. hacksaw or Dremel).


My most recent purchase from Supply Captain included this Urban Camo paracord and the Emerson Skull attached to the loop of the Crown Sinnet. For the other fob I chose to use the classic style of the Solomon Bar which will never go out of style.


This tactical-looking pouch can be tied easily using one knot design. If you look closely at the pouch you will notice that it is simply a Wide Solomon Bar that is lashed together on the sides.

The amount of paracord you will need depends on the size of the pouch, I used four-seven feet long strands for the Wide Solomon Bar section and two-four feet long strands for the sides. You will also need a short strand to go around the top of the pouch and about two feet for the Solomon Bar on the backside to make a loop for a belt.


Recently while trolling the internet, I came across this design tied by a fellow Blogger. He was tying the design mainly for use as a leash, but this is a tough, rugged looking design that can be used in many different ways. Before tying this lanyard, I thought about using this design as a strap to replace the "Oh Crap" handles in my Jeep.


UPDATED TUTORIAL


I recently purchased some exciting new colors of paracord from Supply Captain and I thought I would use one of those colors to tie one of my favorite bracelet designs by TyingItAllTogether. The color I chose to use is called Urban Camo and I used approximately 6-7 feet for the main color, you will also need a core strand, I used approximately 2 feet of black.


Last week I decided I would go on a little hiking and fishing trip and I would need to take along the right type of paracord bracelet. Although the Stitched Solomon Bar by JD at TyingItAllTogether isn't what I would call a "survival" design, it is becoming one of my all-time favorite bracelet designs, so I decided it would be the design I wanted to tie.


This is a variation of a design by Hotmetalmel from the Fusion Knots Forum it uses fused Cross Knots separated by the Endless Falls Knot by TyingItAllTogether. I added a loop for a keychain and attached it with a couple of Blood Knots.

The Cross Knot looks good from the front and backside, but on this design, I prefer the look of the backside of the knot coupled with the backside of the Endless Falls Knot which makes a great looking bar.


I decided since the tutorial was going to be rather long that I would publish this tutorial on Instructables instead of one big post.

You can view the tutorial by clicking this link.

You can download the full tutorial in PDF form by clicking this link.

I was thinking for my first tutorials that I would show some of the knot designs that you might commonly see, I've noticed many great looking Wall Knot designs on Stormdrane's blog. This is a great design, it's easy to tie and can be used with different strand variations. I am showing the directions for a Two Strand Wall Sinnet, but the directions are the same regardless of the amount of stands you choose to use as long as there are more than one.
A Wall Knot is tied almost like a Crown Knot, but instead of going over its neighbors loop, it goes under. It sounds more complicated than it actually is, so check out the tutorial for a better visual description.


For this post I thought I would show one of the knots that I have been working on recently. JD at TyingItAllTogether created the original version of this knot and published a video on the tying technique. The original design is great, but when I started fiddling with a few strands of cord the other day I thought I would see how it looked in a "wide" form.
I am labeling this knot as a prototype because I don't know how useful folks will find the design since it is wider than most lanyard knot designs. With your feedback I will determine if a tutorial should be made.


If you have noticed the scrolling marquee, I stated that changes are coming to my blog. From this point forward, almost every knot design that I post will be accompanied by a tutorial that will show how I tied the knot.  I will only be adding a tutorial if the knot meets the following criteria:
- If there are no tutorials for the knot freely available online.
- If the tutorial(s) that are available aren’t clear or I feel that I can add something to make it easier to tie the design.


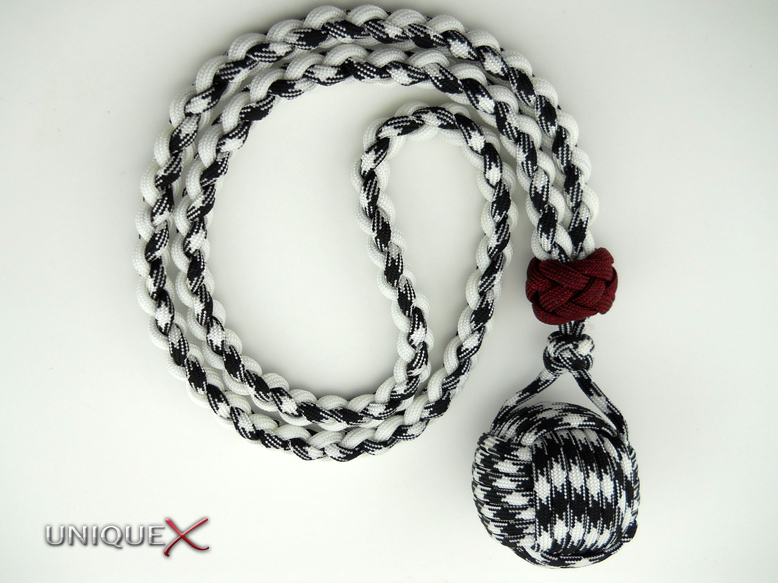
I have been working on this post since receiving my new "Panda Camo" paracord from Supply Captain a couple of weeks ago. I wanted to publish the designs prior to Alabama winning the BCS National Championship, but once they won I’ve been celebrating and haven’t had time until now. For those who don’t understand why I am using this color paracord to tie Alabama-themed designs, I will explain. One of the greatest coaches in Alabama history often wore a houndstooth hat and I believe that this color is a great match for that design.
For those who don’t follow or care about football, I hope you will still find this post useful.


On my last hunting trip while navigating to the tree stand, I ended up dripping with sweat in 30° F weather. It occurred to me that I needed to lighten my load so that on future trips I won’t be freezing once I get settled in the stand from the amount of perspiration on my clothing.
An easy way to lose a little weight is to change my hunting knife. I am a lifelong fan of Buck knives, these are well made with good quality materials and they won’t break the bank. That’s when I decided to purchase the Buck PakLite Skinner which looks like the popular Esee Izula knives, but about forty dollars cheaper.

Designs by ViperLabs DevTEAM